Moorland Track Reconstruction 2

Click here For Welcome Page and Site Navigator

Site 4; Holwell Tor Quarries, 75007775

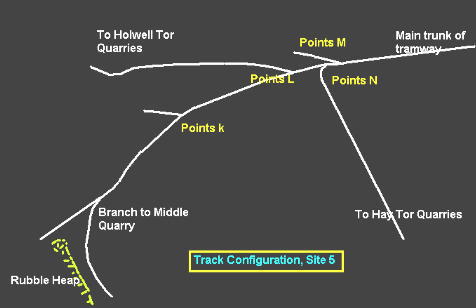
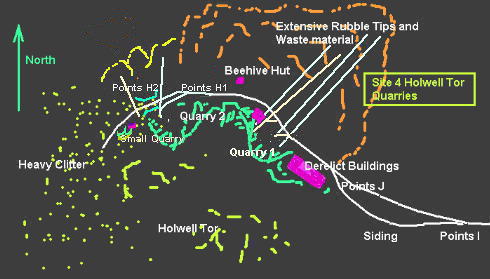
These quarries and those at Site 6, Hay Tor Quarries certainly appear to have been the most important quarries with Middle Quarry also being of prime importance. The other westerly quarries were under worked and obviously not as commercially viable. The branch leading to these Hollwell Tor quarries occurs at Points L, which can be viewed on the map for Site 5.

There are quite a number of interesting things to see at these quarries, amongst them there is a very well preserved beehive hut probably used for shelter during blasting operations, a picture of which can be seen below. Just before quarry 1 is reached along the branch line to the quarries, indentations in the track at Points J and I suggest some sort of siding, although all that can be seen at present is a grassy and rocky bank. A little further on from Points J to the quarry side of the track are the remains of some buildings. These may have been for human habitation but a more likely scenario is that they were used as stables. Horses will always have been used on this section of lines to get even single wagons up the incline. It is unlikely that full length and fully laden trains used this branch because of the gradien of the track from points L mentioned earlier. Other buildings can be seen in the two quarries and a smaller one in the clitter at the western end of the track.  Points K and M seen on Site 5, will have most likely been short spurs for the storage of wagons waiting for a train heading to Teigngrace. The use of the siding if this is true is a little problematic. Quite a length of  wagons will have been accomodated here, probably a full train. this siding then possibly performed the same function as the ridge track at site 1, where wagons could be stored overnight and horses rested prior to the rigours of the following day.
The granite in both quarries appears to be of very good quality with jointing being well spaced. The extensive clitter on the western side of Holwell Tor may also have been a usefull source of rock together with the very small quarry also located here.

Beehive hut, Holwell Tor quarry 2
Beehive hut, Holwell Tor quarry 2.
Quarry 1, Holwell Tor
Quarry 1, Holwell Tor.

The three tracks seen leaving the quarry face in the first quarry are cut by the main track at right angles, together with a track that cuts the main tramway obliquely. They extend into the extensive rubble tips adjoining the first quarry. These short tracks will obviously have been used for waste disposal and also for pulling large blocks away from the quarry face in order to work ok on them. They are seen to be cut by the main tramway with no indentations on the main track. This suggests they pre-date the main tramway as it is seen today. Evidence of a short spur leading into the quarry can be seen as a slight track mis-alignment at the western side of this quarry. A further spur of the same nature probably led into the quarry at it's eastern end althought visual evidence from the track is lacking because the track appears to have sunk below the particularly boggy ground at this point. The remains of the building at the western side of the quarry are directly in the path of the last rubble tip track at right angles to the main track. This means that the building was constructed later than this short stretch of rubble track. Rubble Tip Track Leading from Quarry 1 and crossing main track.
Rubble Tip Track Leading from Quarry 1 and crossing main track.

The tramway bends around into quarry 2 on the north side of Holwell Tor. Points H1 sees the track split, one spur heading  over a small bridge or wall spanning about one metre and the other turning in towards the quarry face. It is also joined here by another of the rubble disposal tracks. This one though was only very short. This short rubble track cuts the main track that goes over the small bridge with no track indentations to suggest that these two lengths of track were ever joined or allowed wagons to pass this point. This suggests that the short track was constructed after the main trunk of the tramway. The main track then carries on following the contour of the hillside which at this point is heavily clittered and is again cut by a short rubble tip track, once again showing no indentations which might suggest trams were allowed to pass this point. A small quarry can also be seen together with a small derelict building on the far side of the bridge/wall. It is totally lost from view at times. Eventually after about 40 yards the track is lost.

Points In Quarry 2 Showing Track Splitting, the main track running over the bridge shown in the picture on the right.
The Bridge At Holwell Quarries, Quarry 2

The main track leading into the clitter over the small bridge may possibly have been in use before the short rubble tip track was constructed. This may mean that the clitter and the small westerly quarry was mined before quarry 2 was opened. After the second quarry was opened there was no longer any requirement for this track.  The small bridge was built to support the main track and keep the gradient easily navigable and also to allow material to be taken away from Quarry 2, where the level of quarrying had dropped below that of the tramway. Another scenario might be that the final quarry and clitter were mined after Quarry 2 had become defunct and therfore a wall come bridge was built over the gap between the two quarries to support the tramway. This however does not explain why the two rubble tracks cut the main tramway with no indentations on the main tramway that would have allowed a tram to pass.
Site 5; Track Configuration, 75777777

The track configuration here at site 5 are is easy to follow mainly because of the very good condition of the main trunk of the tramway from Middle Quarry and Rubble Heap all the way to the Manaton Road. Points K is again one of those short spurs that go nowhere in particular and so are those points seen at Points M. As mentioned earlier these were probably short stretches of track that may have been used for holding wagons prior to their descent on a train. They may also have been useful in aiding passing.
Points L are very well defined, this is where the branch to Holwell Tor quarries starts.

Points N, which sees the meeting of a length of track from the north end of Hay Tor Quarries has caused me a few problems but solved alot more. The track does bend to the east as shown on the schematic but there are no indentations on the main trunk of the tramway that would allow a wagon to connect with it. Very importantly this means that the main westerly trunk post dates the spur going to the north side of the quarries. This would suggest that the Hay Tor quarries were brought into full production using a tramway prior to the main westerly trunk being constructed to the other more westerly quarries which include in this case Holwell Tor Quarries and Middle Quarry.

When construction of the main trunk commenced there was no longer any need for this track and it was not joined to the main trunk of the tramway.

Main Trunk of the tramway, east of Points M
Main Trunk of the tramway, east of Points M.
The track running to the north side of Hay Tor Quarries is not immediately obvious, but can be traced. The track is marked on some maps by a footpath, the occasional setss can be seen in places if this path is followed. The southerly end of it is easily seen and picked out. This is discussed in the Hay Tor quarries section below. Points L, branch to Holwell Tor Quarries.
Points L, branch to Holwell Tor Quarries.

NEXT PAGE

Click here For Welcome Page & Site Navigator